Bon Voyage Layout
Hello!
Today I have a layout to share that is in no way holiday related! For this layout I used the Imaginisce Bon Voyage line.
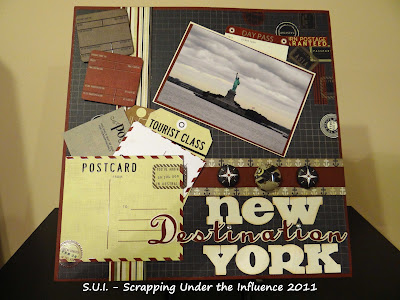
Don't you just love the brads? I made those using the Imaginisce i-Top from papers in the Bon Voyage line.


I cut my title using the Cricut Expression 2-Anniversary Edition with the Songbird and Don Juan cartridges using coordinating cardstock. For the shadow on "destination" I used my Gypsy to weld the letters together. I lightly inked them with Tim Holtz Vintage Photo Distress Ink.

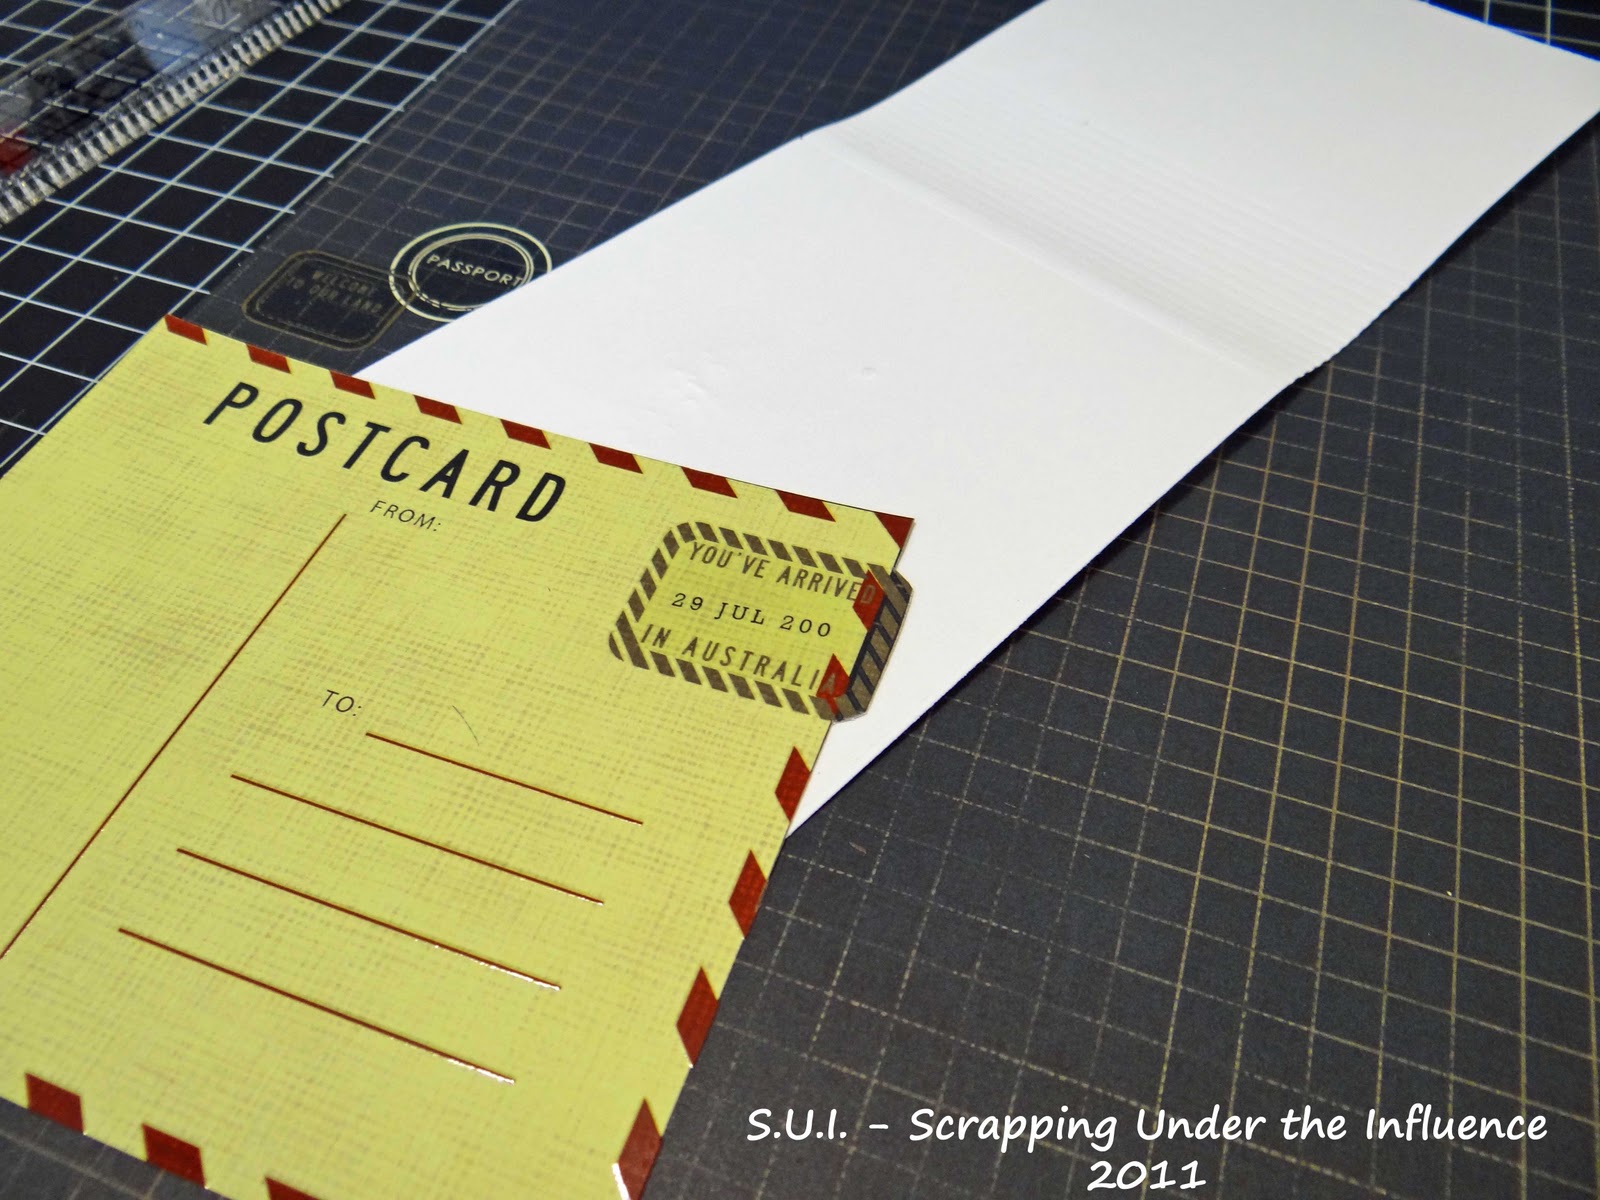
There are couple of different elements on this page. I started with the Postcard From Afar 12x12 paper. I trimmed 1/4" off two sides so that I could mount the page on a sheet of coordinating plain cardstock.

Before I mounted it I trimmed around the postcard on the sheet to make a pocket. I trimmed all the way across the top of the postcard.

On the side I trimmed down about 2", going around the little tab on the side of the card.


After I cut the pocket I mounted the sheet on the plain cardstock.

Next, I made the brad for the layout. Imaginisce does make punches to cut the paper for their i-Top but they also make these little stencils. If you don't make tons of brads (or buttons, or badges, or one of the many other things the i-Top makes) then the stencil will work just fine. (Or if you have nowhere to shop for scrap supplies like me and you have no choice!)

Making brads can be a little tricky but I'll share a trick I learned when I first bought my i-Top - very thin glue dots.

Put a glue dot either on the back of the paper (as shown below) or on the button part of the brad and line up your paper. Stick the two together and then put it in the i-Top handle. This helps to keep your paper aligned.


I added the brads to a strip of cardstock that I then adhered to another strip of the patterned paper. I also added a strip of the striped paper on the side. The striped paper is 1 1/2" wide. the patterned paper is 1".The brads are 22mm and 28mm.

Next, I took a sheet of the Stateroom Baggage paper and trimmed a few of the different tags. I could have used the die cuts that Imaginisce makes but I wanted the tags to have the pattern from the back of that sheet.


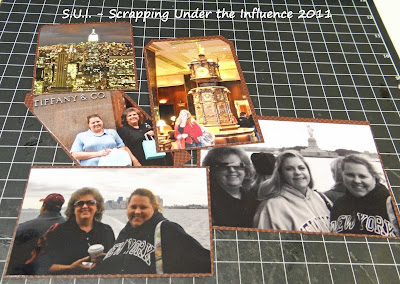
I used the backs of the tags for pictures.
The tags then go in the postcard pocket and the pocket I made under my photo mat by only adhering three sides.

And there you have it!

Today I have a layout to share that is in no way holiday related! For this layout I used the Imaginisce Bon Voyage line.

Don't you just love the brads? I made those using the Imaginisce i-Top from papers in the Bon Voyage line.


I cut my title using the Cricut Expression 2-Anniversary Edition with the Songbird and Don Juan cartridges using coordinating cardstock. For the shadow on "destination" I used my Gypsy to weld the letters together. I lightly inked them with Tim Holtz Vintage Photo Distress Ink.

There are couple of different elements on this page. I started with the Postcard From Afar 12x12 paper. I trimmed 1/4" off two sides so that I could mount the page on a sheet of coordinating plain cardstock.

Before I mounted it I trimmed around the postcard on the sheet to make a pocket. I trimmed all the way across the top of the postcard.

On the side I trimmed down about 2", going around the little tab on the side of the card.

After I cut the pocket I mounted the sheet on the plain cardstock.

Next, I made the brad for the layout. Imaginisce does make punches to cut the paper for their i-Top but they also make these little stencils. If you don't make tons of brads (or buttons, or badges, or one of the many other things the i-Top makes) then the stencil will work just fine. (Or if you have nowhere to shop for scrap supplies like me and you have no choice!)

Making brads can be a little tricky but I'll share a trick I learned when I first bought my i-Top - very thin glue dots.

Put a glue dot either on the back of the paper (as shown below) or on the button part of the brad and line up your paper. Stick the two together and then put it in the i-Top handle. This helps to keep your paper aligned.


I added the brads to a strip of cardstock that I then adhered to another strip of the patterned paper. I also added a strip of the striped paper on the side. The striped paper is 1 1/2" wide. the patterned paper is 1".The brads are 22mm and 28mm.

Next, I took a sheet of the Stateroom Baggage paper and trimmed a few of the different tags. I could have used the die cuts that Imaginisce makes but I wanted the tags to have the pattern from the back of that sheet.

On the front of the tags I added a little journaling - kind of. I 'm not a big journaling person, mostly because I HATE my handwriting...but in small doses it can be fairly legible.

I used the backs of the tags for pictures.

The tags then go in the postcard pocket and the pocket I made under my photo mat by only adhering three sides.

And there you have it!

Supplies:
Imaginisce Bon Voyage Line: First Class, Stateroom Baggage, Postcard from Afar, Far & Away, Incredible Journey
Imaginisce i-Top and Brad Daddies: 22mm and 28mm
Imaginisce iRock and Crystals
Bazzill Basics Cardstock: Cream and Dark Cranberry

Comments
Carolyn
http://cccscraproom.blogspot.com