Cricut Explore and Design Space First Impressions
Good morning!
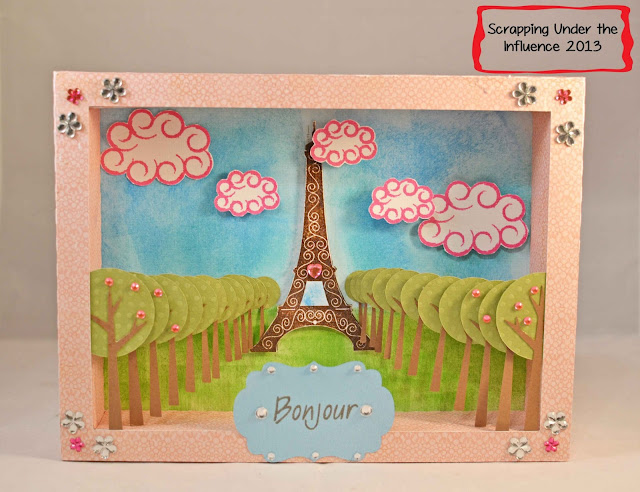
If you follow me on Facebook you probably know that I caved and bought a Cricut Explore. Below is my first project, one of the pre-designed projects available through Design Space. You literally select it, find your cardstock, and cut. It's all sized, laid out, etc.

Despite some excellent customer service from Cricut when I had issues with my out of warranty Gypsy, I said I was done. The quality of the cuts from Expression 2 were not as good as my Expression. While my Imagine still works to this day, and I made on of my all-time favorite projects with it, it's had odd calibration issues. I was impressed with the Cricut Craft Room software but irritated that I'd spent the money on the Gypsy to have it quickly replace with what I felt was a better option.
I was never one that had a problem with Cricut; I never used SCAL or MTC or did anything to hack my original Expression and use it in a way other than what Cricut intended, that's just not my thing. I own about 150 cartridges. I have always loved Cricut for their simplicity and ease of use. Need a giant number to use as a template on a birthday cake? Took me less than five minutes to make. Last minute card idea? Start to finish, 1 hour.
I added a Silhouette SD to my craft room because of their Print and Cut feature and the ability to use print and cut from something other than cartridges. I did some early projects but felt limited by the 8 1/2 x 11 size. I upgraded to the Silhouette Cameo but as Silhouette has updated their incredibly hard to use software the Print and Cut function doesn't work quite right and loses calibration regularly.
I also own a Sizzix eClips that I truly love. The software is identical on SCAL, but is specifically for the eClips. It's easy to use and it cuts SVG files, which was the whole reason I bought the machine in the first place. I had a few cartridges available but they were very difficult to use. So basically, if I wasn't cutting SVG files, the machine is useless to me. It also has a Print and Cut feature but it's very difficult and I've never used it.
So that brings us to last week. I was seeing all this buzz about the new Print then Cut feature available on the new Cricut Explore. The Explore has been out for a few months and had some features I liked but I never looked too closely at it. Then I got an email from Cricut. As a registered Imagine user I was being given permanent free access to all Imagine images for use with the new Print then Cut feature. Since that only works on the new Explore I started doing some research.
And it got me excited about crafting again. For the first time in months I wanted to make STUFF.
By Wednesday that sucker was in my cart on Amazon and on it's way to my house. It set up in about 20 minutes, including doing the firmware update. I cut a Disney logo in less than 5 minutes. Wow.
The Explore is much quieter than any other cutting machine I own. One thing I thought was kind of neat is fact that it will write and the cut without changing out the blade. Or score then cut. When you lay out your project in Design Space you can tell it what you want it to do to each layer.
As for Design Space. I fell in love with my first attempt. When you select a Cricut image in Design Space it brings up the image as it would be once you cut and pieced it together. Once you change your mindset from looking at a cutting mat to looking at a finished project it makes Design Space much easier.

Here are four different files from Create a Critter. I've laid it out as if I were going to make a card. I have sized my images and laid them out as I would on the card front. When I click the little green Go button, Design Space breaks all that cuteness out into the mats for each color. If you want to group like colors together you click on the sync button and drag and drop what you want to cut from the same color. Design Space arranges your images on the mats to save paper, maybe not as much as if you did it yourself, but I'd rather sacrifice three square inches of cardstock to not have to spend 30 minutes arranging things on mats.
It's literally that simple. Then importing SVG files you don't even have to have them laid out in a way that makes sense.

This is the lantern file from SVG Cuts Spooky Soiree set. Once I sized the different pieces according to SVG Cuts sizes (listed on the cutting guide with each kit) I was able to select all and size the project to the size I wanted the finished product to be. I don't have to separate them out onto separate mats, Design Space will do that. So was able to size my project and leave it a jumbled mess and still have it cut perfectly.


If you follow me on Facebook you probably know that I caved and bought a Cricut Explore. Below is my first project, one of the pre-designed projects available through Design Space. You literally select it, find your cardstock, and cut. It's all sized, laid out, etc.
Despite some excellent customer service from Cricut when I had issues with my out of warranty Gypsy, I said I was done. The quality of the cuts from Expression 2 were not as good as my Expression. While my Imagine still works to this day, and I made on of my all-time favorite projects with it, it's had odd calibration issues. I was impressed with the Cricut Craft Room software but irritated that I'd spent the money on the Gypsy to have it quickly replace with what I felt was a better option.
I was never one that had a problem with Cricut; I never used SCAL or MTC or did anything to hack my original Expression and use it in a way other than what Cricut intended, that's just not my thing. I own about 150 cartridges. I have always loved Cricut for their simplicity and ease of use. Need a giant number to use as a template on a birthday cake? Took me less than five minutes to make. Last minute card idea? Start to finish, 1 hour.
I added a Silhouette SD to my craft room because of their Print and Cut feature and the ability to use print and cut from something other than cartridges. I did some early projects but felt limited by the 8 1/2 x 11 size. I upgraded to the Silhouette Cameo but as Silhouette has updated their incredibly hard to use software the Print and Cut function doesn't work quite right and loses calibration regularly.
I also own a Sizzix eClips that I truly love. The software is identical on SCAL, but is specifically for the eClips. It's easy to use and it cuts SVG files, which was the whole reason I bought the machine in the first place. I had a few cartridges available but they were very difficult to use. So basically, if I wasn't cutting SVG files, the machine is useless to me. It also has a Print and Cut feature but it's very difficult and I've never used it.
So that brings us to last week. I was seeing all this buzz about the new Print then Cut feature available on the new Cricut Explore. The Explore has been out for a few months and had some features I liked but I never looked too closely at it. Then I got an email from Cricut. As a registered Imagine user I was being given permanent free access to all Imagine images for use with the new Print then Cut feature. Since that only works on the new Explore I started doing some research.
And it got me excited about crafting again. For the first time in months I wanted to make STUFF.
By Wednesday that sucker was in my cart on Amazon and on it's way to my house. It set up in about 20 minutes, including doing the firmware update. I cut a Disney logo in less than 5 minutes. Wow.
The Explore is much quieter than any other cutting machine I own. One thing I thought was kind of neat is fact that it will write and the cut without changing out the blade. Or score then cut. When you lay out your project in Design Space you can tell it what you want it to do to each layer.
As for Design Space. I fell in love with my first attempt. When you select a Cricut image in Design Space it brings up the image as it would be once you cut and pieced it together. Once you change your mindset from looking at a cutting mat to looking at a finished project it makes Design Space much easier.
Here are four different files from Create a Critter. I've laid it out as if I were going to make a card. I have sized my images and laid them out as I would on the card front. When I click the little green Go button, Design Space breaks all that cuteness out into the mats for each color. If you want to group like colors together you click on the sync button and drag and drop what you want to cut from the same color. Design Space arranges your images on the mats to save paper, maybe not as much as if you did it yourself, but I'd rather sacrifice three square inches of cardstock to not have to spend 30 minutes arranging things on mats.
It's literally that simple. Then importing SVG files you don't even have to have them laid out in a way that makes sense.
This is the lantern file from SVG Cuts Spooky Soiree set. Once I sized the different pieces according to SVG Cuts sizes (listed on the cutting guide with each kit) I was able to select all and size the project to the size I wanted the finished product to be. I don't have to separate them out onto separate mats, Design Space will do that. So was able to size my project and leave it a jumbled mess and still have it cut perfectly.
This was first attempt at Print the Cut. So simple to get it laid out and ready to go. Printed in a flash. The only issue I had was you can't used colored, or in this case Silhouette Kraft Labels, for print and cut. I got around this by lining up my registration marks from my test print and attaching them with washi tape. Worked perfectly. The label is from CTMH Art Philosophy, the font is Cuttin' Up.
Then I decided to try some files I'd had issues with when trying to Print and Cut using the Silhouette. First is a princess from Lettering Delights, second is Scully from Jake and the Neverland Pirates (A JPEG I downloaded), and finally is the little s'more guy from a digital set of Cosmo Cricket's Mr. Campy paper line. They all cut perfectly. The import process took minutes. Design Space didn't read Rapunzel's hand as blank space and cut it off. Same for the skulls in Scully's bandana. My only issue is I'm once again limited by the 8 1/2 x 11 size but that will be changed with a future update.
Just my thoughts. I have another project to post in just a few for my entry to SVG Cuts Autumn Challenge. Let me just say the ease of using Design Space and the Explore is the reason I entered. I did the whole project on Sunday, start to finish, with frequent interruptions by the toddler for cuddling and snacks, and of course dinner.

Comments